Hi all. Several months ago, I trained a deep neural network (DNN) model for solving captcha from a certain website. Previously, I have created a python project for scraping some data from this website, but the user must manually input the captcha for logging into the website, which is irritating because the web-scraper script need to be run every day. With this model, the user doesn’t have to do that anymore.
The model pipeline is like this:
- Open the login page and retrieve the captcha image.
- Preprocess the image by segmenting each character, pad each image to be square, and shrunk the size of the image.
- For each character image, feed it into the neural net model, and get the answer. Concatenate the characters to get the captcha word
- Send the login credentials along with the captcha answer
The hardest problem is to train the model so that it can accurately predict the characters.
To get a sense of the problem at hand, here are some examples of the captcha:
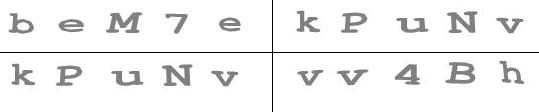
I noticed the following properties of those captchas:
- The characters are randomly skewed or rotated slightly
- The characters are perfectly separable (i.e., no overlapping characters)
- The characters are only limited to this list of 43 characters:
2345678ABDEFHJMNQRTYabcdefhijkmnpqrstuvwxyz
Now, why didn’t I use Tesseract OCR (a very good open-source OCR program)? Well, I tried it at first, but I found the result to be too inaccurate to be acceptable. In many cases, Tesseract couldn’t even accurately predict how many characters there are in the image.
Building the training data
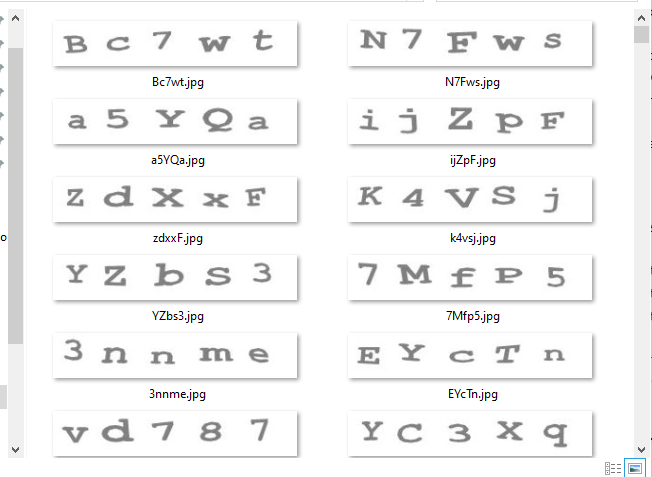
As many of you already know, training a machine learning model requires a lot of data, especially for a DNN model. So, I wrote a python script to download a bunch of captcha images from the website. In the end, I ended up with 398 images, which I then proceeded to rename manually so that each file name is equal to the content of the image, like so:
The labeling process was a little bit tedious, but still manageable.
Preprocessing the image
To make the model training significantly easier, I need to separate each image into individual characters. In other words, instead of having to process a single picture containing five letters, I want the model to only need to process each character individually.
Separating each character is trivial since the characters have no overlap in the X-axis. All I had to do was to project the pixels to the X-axis, and locate where there are changes in the pixel’s color. For example, given this image …

… we can project the pixels to the X-axis to get something like this:
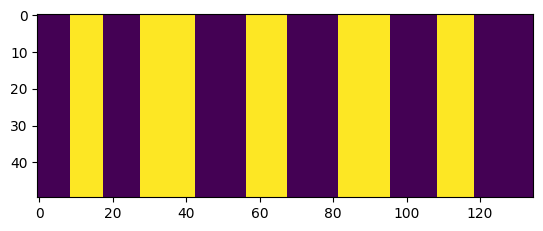
After that, I isolated the characters in the yellow blocks above, and padded each character so that all of them have equal dimension, like so:

As you can see, now we have five images with equal dimension, and in each image there’s only one character.
The complete algorithm is as follows:
from PIL import Image
import numpy as np

N_CHARS = 5

def preprocess_image(im: Image.Image) -> np.ndarray:
    """
    Convert image into (n_chars x width x height) numpy array, where
    n_chars is equal to 5. It is assumed that each letter in the image
    is perfectly separable using vertical lines.

    Parameters
    ----------
    im : Image.Image
        The input PIL Image object containing the text.

    Returns
    -------
    np.ndarray
        A NumPy array of shape `(5, width, height)`, representing each character segment
        as a separate (width x height) array.

    Notes
    -----
    - This function assumes that the image contains exactly 5 characters arranged horizontally.
    - Any necessary preprocessing, such as resizing or grayscale conversion, should be handled
      before calling this function if required.

    Example
    -------
    >>> from PIL import Image
    >>> im = Image.open("path/to/image.png")
    >>> X = preprocess_image(im)
    """
    width_scale = 1 # times the height
    scale = 0.5
    n_chars = N_CHARS
    threshold = 180

    im = im.resize(
        size=(int(im.width * scale), int(im.height * scale))
    )
    arr = np.array(im)[:,:,0] # only use the 1st channel
    x_projection = (arr < threshold).any(axis=0)
    is_cutoffs = (x_projection[1:] != x_projection[:-1])

    assert is_cutoffs.sum() == n_chars * 2

    width = int(width_scale * arr.shape[0])
    cutoffs = 1 + np.where(is_cutoffs)[0]
    cutoffs = cutoffs.reshape(n_chars, 2)

    x_list = []

    for _, (x1, x2) in enumerate(cutoffs):
        subset = arr[:,x1:x2]
        pad_size = width - subset.shape[1]
        assert pad_size > 0
        pad_left = pad_size // 2
        pad_right = pad_size - pad_left
        subset = np.pad(subset, [
            (0, 0),
            (pad_left, pad_right)
        ], constant_values=255)

        x_list.append(subset)

    X = np.array(x_list)
    return X
Synthesizing new data using augmentation
Recall that I scraped 398 captcha images, and each image contains five characters, which means that I have 398 x 5 = 1990 character images in total. There are 43 possible characters, so on average each character has ~46 images. However, the distribution of each character is not balanced, so some characters got less than that, and some got more. I believed that the number of training data is not enough for training a DNN model. Since I didn’t want to scrape hundreds more images and manually label them again, I resorted to data augmentation technique. What this means is that I used the existing image data and applied some random transformations to them (i.e., rotate or skew slightly). Luckily, pytorch already provided a ready-made function to do that (via the torchvision module).
Here’s the code that I ended up writing:
from torchvision.transforms import v2
import torch

def transform_tensor(X: torch.Tensor, affine_dict: dict[str, Any]) -> torch.Tensor:
    '''
    Transform the given N x H x W tensors using some affine transformations.
    The transformation is done on each N separately. `affine_dict` is input to
    v2.RandomAffine.

    Parameters
    ----------
    X : torch.Tensor
        Tensor of shape (N, H, W) where N
        is the number of samples, H the height,
        and W the weight

    Returns
    -------
    torch.Tensor
        Transformed tensor of shape (N, H, W)
    '''
    X = X[:,None,:] # add channel layer
    transform = v2.RandomAffine(**affine_dict)
    # index [0] to get the first channel layer
    out = torch.stack([transform(xi)[0] for xi in X])
    return out

def augment_data(
    X: torch.Tensor,
    y: torch.Tensor,
    affine_dict: dict[str, Any],
    n: int,
    shuffle: bool,
    keep_original: bool,
) -> tuple[torch.Tensor, torch.Tensor]:
    '''
    Generate new data such that each unique
    class in y consist of n observations in the
    output. The generated data came from X but applied
    some random transformations.

    Parameters
    ----------
    X : torch.Tensor
        Tensor of shape (N, H, W)
    y : torch.Tensor
        Tensor of shape (N) of type int
    n : int
        Number of generated samples per class
    shuffle : bool
        Whether to shuffle the generated data or not
    keep_original : bool
        Whether to include the original data or not

    Returns
    -------
    output : torch.Tensor
        Tensor of shape (K * n, H, W) where
        K is the number of classes in y
    '''
    X_list = []
    y_list = []
    n_class = y.max()
    for k in range(n_class):
        ix = torch.where(y == k)[0]
        # oversample ix
        ix = ix[torch.randint(len(ix), (n, ))]
        X_k = X[ix]
        y_k = y[ix]
        X_list.append(X_k)
        y_list.append(y_k)
    X_out = torch.cat(X_list)
    # apply transformations
    X_out = transform_tensor(X_out, affine_dict)
    y_out = torch.cat(y_list)

    if keep_original:
        X_out = torch.cat([X_out, X])
        y_out = torch.cat([y_out, y])

    # shuffle the data
    if shuffle:
        ix = torch.randperm(X_out.shape[0])
        X_out = X_out[ix]
        y_out = y_out[ix]
    return X_out, y_out
Equipped with the above function, I was able to increase the number of training data by several thousands. Incidentally, augmenting the data like this also serves to improve out-of-sample performance (i.e., reducing overfitting).
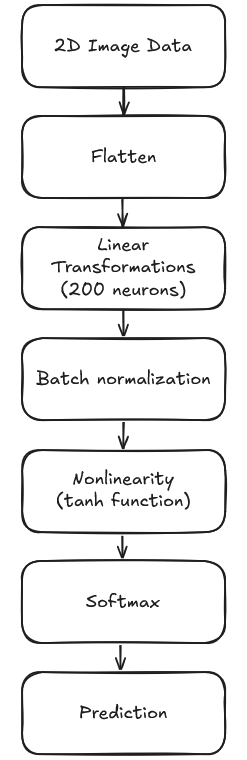
Model architecture and training procedure
I tried several models, but in the end I settled with the following procedures:
- First, preprocess the 2D image into a flat 1D array so that it can be processed by the neural network. Since this approach already worked very well, I didn’t need to use more complex method like convolution (which could process the 2D image directly).
- Then, for the neural network:
- Use a single hidden layer with 200 neurons, and use tanh function for the non-linearity
- Apply batch normalization before feeding into the tanh function
- Use dropout layer and L1 penalty as regularization (useful to get better out-of-sample performance)
- Use batch size=128 and 25k number of epochs
Below is the model architecture:
How many parameters does this model have? Let’s calculate:
- The input image dimension is 25 x 25 pixels, which means there are 625 numbers as input
- The hidden layer has 200 neurons
- The output layer has 43 neurons (since there are 43 possible characters)
- Now we only need to multiply all the above numbers: 625 x 200 x 43 = 5,375,000
As you can see, this model have more than 5 million parameters, which means that without proper regularization or with very limited data, the model would likely overfit the training samples.
Here’s the code for setting up the model and loss function:
from torch import nn

model = nn.Sequential(
    nn.Flatten().float(),
    nn.Linear(height * width, n_neurons),
        nn.BatchNorm1d(n_neurons),
        nn.Tanh(),
        nn.Dropout(p=0.4),
    nn.Linear(n_neurons, n_class)
)
loss_fn = nn.CrossEntropyLoss()
Meanwhile, below is the training function:
import torch
from torch import nn

def train(
    model: nn.Module,
    X_train: torch.Tensor,
    y_train: torch.Tensor,
    X_valid: torch.Tensor,
    y_valid: torch.Tensor,
    loss_fn: nn.CrossEntropyLoss,
    batch_size: int,
    n_epochs: int,
    learning_rate: float,
    l1_lambda: float,
    seed: int,
) -> pd.DataFrame:
    torch.manual_seed(seed)
    optimizer = torch.optim.Adam(model.parameters(), lr=learning_rate) # type: ignore
    train_losses = []
    valid_losses = []

    for param in model.parameters():
        param.requires_grad = True

    for i in range(n_epochs):
        ix = torch.randint(0, len(X_train), (batch_size, ))
        X_train_batch = X_train[ix]
        y_train_batch = y_train[ix]
        logits = model(X_train_batch)
        loss = loss_fn(logits, y_train_batch)

        # add L1 penalty as regularization
        for layer_name,layer_param in model.named_parameters():
            if 'weight' in layer_name:
                loss += l1_lambda * layer_param.abs().sum()

        loss.backward()
        optimizer.step()

        # save train and validation loss
        with torch.no_grad():
            model.eval()
            train_loss = loss_fn(model(X_train_batch), y_train_batch)
            valid_loss = loss_fn(model(X_valid), y_valid)
            train_losses.append(train_loss.item())
            valid_losses.append(valid_loss.item())
        model.train()

        # print training progress
        if i % 200 == 0 or i == n_epochs - 1:
            print(f'epoch:{i:<8}train_loss:{train_loss.item():.4f}  valid_loss:{valid_loss.item():.4f}')

    print('Training finished')
    model.eval()
    losses_df = pd.DataFrame({
        'train': train_losses,
        'valid': valid_losses
    })
    return losses_df
When the training was finished, I plot the time series of the training and validation loss:
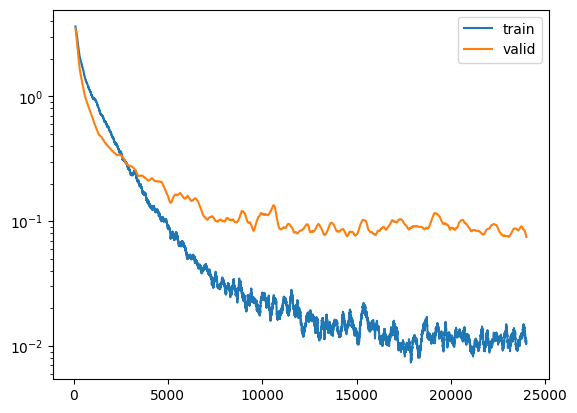
As you can see, the loss gradually declines overtime, which is a good sign that the model is capable of learning the patterns in the image.
In the end, the best model achieved 98.61% accuracy out-of-sample (on the validation set). Below, I have plotted the characters that are mislabeled by the model:
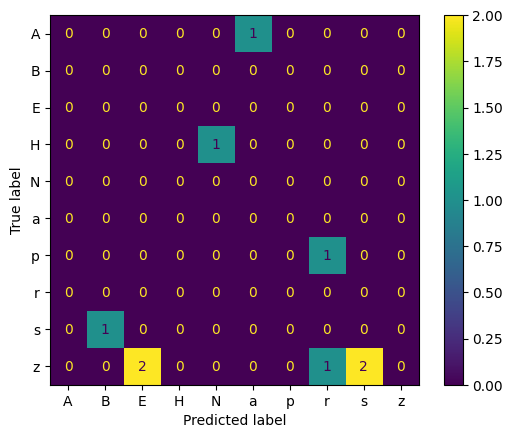
In the plot above, the X-axis indicate the predicted label, while the Y-axis indicate the actual label. For example, the number “2” in the most bottom row & third column means that the model predicted the letter “z” as the letter “E” two times among all the validation set.
Apparently, the most confusing letter for the model is the letter “z”, since it’s confused with the letter “E”, “r”, and “s”.
Model accuracy
As I have stated, the best model achieved a 98.61% accuracy out-of-sample. However, we need to predict five characters at a time. So, what’s the probability that we get all five characters correct? It’s equal to 0.98615 = 0.9324, or only 93.24%, which I thought was not good enough.
But then, I remembered that the website allows me to retry inputting the captcha several times without any penalty (when retrying, there’s simply a new captcha image). So, what’s the probability that we’ll get the captcha right in at most three attempts? It’s equal to (1-(1-0.9324)3) = 0.999691, or 99.97%, which is very good, so I decided to stop here.
In fact, when the model was deployed to predict new data, it only need two attempts at most, but mostly succeed at first attempt.
Deploying the model
To deploy the model, I simply did the following:
- Save the model object into an ONNX file (see this documentation to see how); I named the file
model.onnx - Manually copy the
model.onnxfile into the web scraper project, and use onnxruntime for running the model.
Roughly speaking, the code for running the model looks something like this:
import onnxruntime
from PIL import Image

def solve_captcha(img: Image.Image) -> str:
    model_file = "path/to/model.onnx"
    ort = onnxruntime.InferenceSession(model_file)
    # preprocess the image into array of 2D arrays, and convert to float
    X_arr = preprocess_image(img)
    X = X_arr.astype('float32') / 255.0
    # feed the data into the neural network
    logit_pred: np.ndarray = self.ort.run(None, {'X': X})[0]
    # make prediction
    y_pred = logit_pred.argmax(axis=1)
    chars_pred = [chars[i] for i in y_pred]
    # note: chars = list of chars used for training the model
    captcha_pred = ''.join(chars_pred)
    return captcha_pred
I admit that the deploying process is a bit janky. However, it works well enough for my purpose, so I didn’t purse the matter further.
Anyway, I’m happy to report that the model has been deployed now and used everyday at my office with very good accuracy.
Closing remarks
I think that’s it for this post, I hope you learn something new today.